
Step-by-Step Guide to Installing a Countertop Water Dispenser
Tired of wrestling with bulky water bottles or dealing with lukewarm tap water? The short answer: Installing a countertop water dispenser is easier than you think! This guide breaks it down step by step—no plumbing degree required. Keep reading for hassle-free setup, pro tips, and maintenance hacks for Installation and Maintenance of Countertop Water Dispensers!
Step-by-Step Guide to Installing Your Countertop Water Dispenser
Introduction: Preparing for Installation
So, you’ve finally got your hands on a countertop water dispenser—good choice! No more wrestling with clunky water bottles or waiting ages for the kettle to boil. But before you start sipping on crisp, filtered water, you need to set it up.
Don’t worry, it’s easier than you think! Whether you’ve got a bottled, point-of-use (POU), or electric filtered dispenser, this guide will walk you through every step—no leaks, no fuss, just fresh water in no time.
Tools and Materials Needed
Before you get started, make sure you have everything you need:
- Adjustable wrench – For tightening connections.
- Screwdrivers (Phillips and flathead) – Handy for assembly.
- Teflon tape – Helps prevent leaks.
- Measuring tape – Ensures perfect placement.
- Towels – Because spills happen!
- Power drill – If you need to mount anything.
- Replacement filters – If your dispenser has one, always good to have a spare.
Safety Precautions
Let’s keep things safe and simple:
- Unplug electric dispensers before handling any wiring.
- Turn off the water supply before connecting a POU dispenser.
- Wear gloves when dealing with sharp tools or filters.
- Keep the area dry to prevent any accidental slips.
Installation Process for Bottled Water Dispensers
Bottled water dispensers are the easiest to install—no plumbing needed!
Selecting the Right Location
- Find a stable, level surface to prevent wobbling.
- Keep it away from heat sources like ovens or direct sunlight.
- Ensure there’s enough space for easy bottle replacements.
Preparing the Dispenser
- Unbox the unit and check for any damage.
- Wipe it down with a clean cloth.
- Position the drip tray securely to catch spills.
Loading and Securing the Water Bottle
- Remove the seal from the water jug (but don’t remove the entire cap if it has a puncture seal).
- Align the bottle’s spout with the dispenser’s inlet.
- Tilt the bottle slowly into place to prevent air bubbles and spills.
Testing the Dispenser
- Dispense a few cups of water to clear any trapped air.
- Check for leaks around the bottle connection.
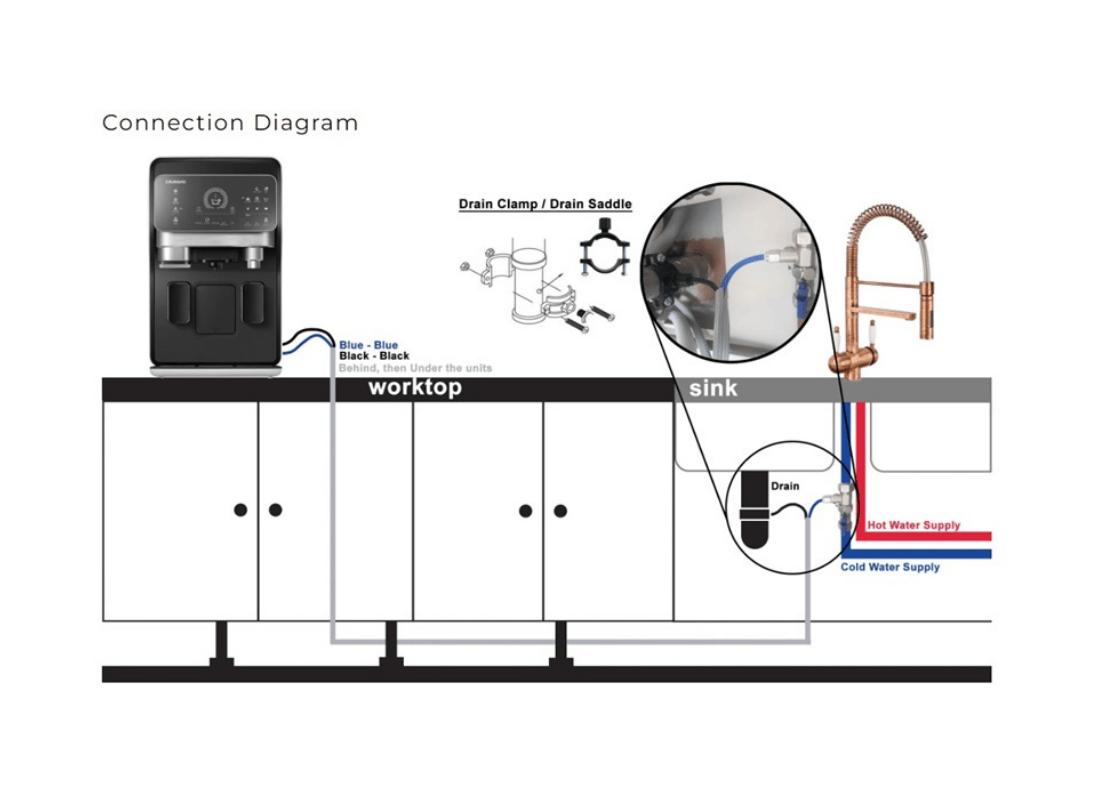
Installation Process for Point-of-Use (POU) Dispensers
POU dispensers connect directly to your water supply—no need for water bottles!
Locating the Water Supply
- Find the nearest cold water line under your sink or along the kitchen wall.
- Make sure the dispenser is close enough to connect without stretching the tubing.
Connecting the Water Line
- Turn off the water supply before making any connections.
- Attach the tubing securely using Teflon tape to prevent leaks.
- Tighten everything with a wrench, but don’t overtighten—just snug enough.
Installing the Filter (if applicable)
- Insert the filter into its designated compartment.
- Flush the system by running water through it for a few minutes.
Checking for Leaks
- Turn the water back on slowly and watch for drips.
- If you spot a leak, tighten the fittings or apply more Teflon tape.
Testing the Dispenser
- Dispense water and check for a smooth flow.
- Adjust the temperature settings if needed.
Installation Process for Electric Filtered Dispensers
Electric dispensers need a power source, but they’re just as easy to set up!
Positioning the Dispenser
- Place it near a grounded electrical outlet.
- Ensure there’s good ventilation around the unit.
Connecting to Power Source
- Plug it directly into the outlet—avoid using an extension cord.
- Check that the power switch is off before plugging in.
Priming the Filter
- Fill the reservoir and let the water flow through the filter.
- Run at least one full cycle to flush out any carbon residue.
Testing the Dispenser
- Dispense both hot and cold water to ensure everything works properly.
- Adjust temperature settings if needed.
Troubleshooting Common Installation Issues
Leaks and Water Flow Problems
- Check if connections are tight but not overtightened.
- Make sure the water bottle (or supply line) is properly seated.
Electrical Issues
- No power? Check if the outlet is working by plugging in another appliance.
- Still no luck? Inspect the power cord for damage.
Filter Installation Problems
- Ensure the filter is correctly positioned—some models click into place.
- Run water through the system to clear any trapped air bubbles.
Post-Installation Checks and Tips
Cleaning and Sanitising
- Wipe down external surfaces weekly to keep it looking fresh.
- Clean internal components every three months with a mild disinfectant.
Setting Up Temperature Controls
- Adjust cooling/heating settings based on your preference.
- Allow the system to stabilise before making further adjustments.
Addressing Common Concerns
Water Pressure Issues
- Check for blockages in the water line—clogs can slow the flow.
- Clean or replace filters regularly to maintain pressure.
Dispenser Stability
- If the unit wobbles, place stabilisers or non-slip pads underneath.
- Avoid overloading the countertop with heavy items nearby.
Conclusion: Enjoying Clean Water with a Properly Installed Dispenser
And there you have it—your water dispenser is up and running! No more plastic bottles piling up, no more waiting for water to cool or heat. Just clean, refreshing hydration at the press of a button.
Keep it well-maintained, and it’ll be your kitchen’s MVP for years to come. Now, go pour yourself a glass—you’ve earned it! 🚰💧
More Countertop Water Dispenser info we think you'll love
Routine Maintenance Tips to Extend the Life of Your Water Dispenser
Troubleshooting Common Issues with Countertop Water Dispensers
How Often Should You Clean Your Countertop Water Dispenser?
How long does a countertop water filter last?
How do you clean a countertop water filter?
Countertop Water Dispenser Maintenance Tips
How to Clean Countertop Water Dispenser Filters at Home
Best Countertop Water Dispenser Maintenance Routine
Countertop Water Dispenser Troubleshooting Guide for Common Issues
Leave a comment